

how to draw a anime girl base step by step
This in depth tutorial explains how to describe a beautiful anime daughter in 15 steps. In item it looks at cartoon the confront of such a character from the forepart view.
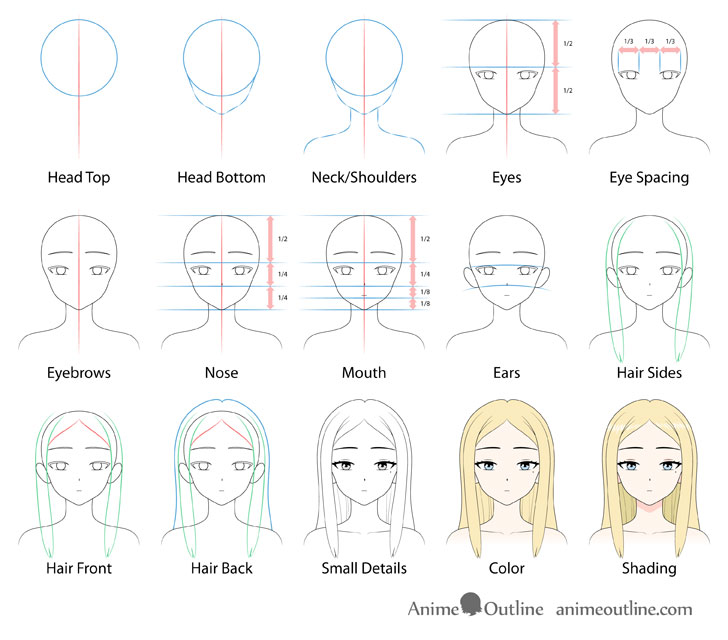
As the title states the focus of this tutorial is on drawing a beautiful female anime character. In anime and manga these oftentimes have roles such as the "pretty daughter" at schoolhouse and may not necessarily be the protagonist. However drawing an anime girl to look cute is really a bit of a claiming as about of them are drawn to exist fairly cute by default. To assist this tutorial gives a through guide on how to describe and position the head and facial features for a "pretty girl" character archetype.
Delight note that if y'all've seen other similar tutorials here on AnimeOutline there may be a few overlapping or like information. However this particular graphic symbol does have slightly unlike proportions so read carefully.
Also annotation that while the proportions in this tutorial can help achieve the "cute girl" look, this is just one example and there are many more ways to draw such a character.
Overall the tutorial combines good cartoon practices that can apply to art in full general with tips on getting a particular anime/manga style look.
Stride one – Draw the Centre Guide Line & The Top of the Head
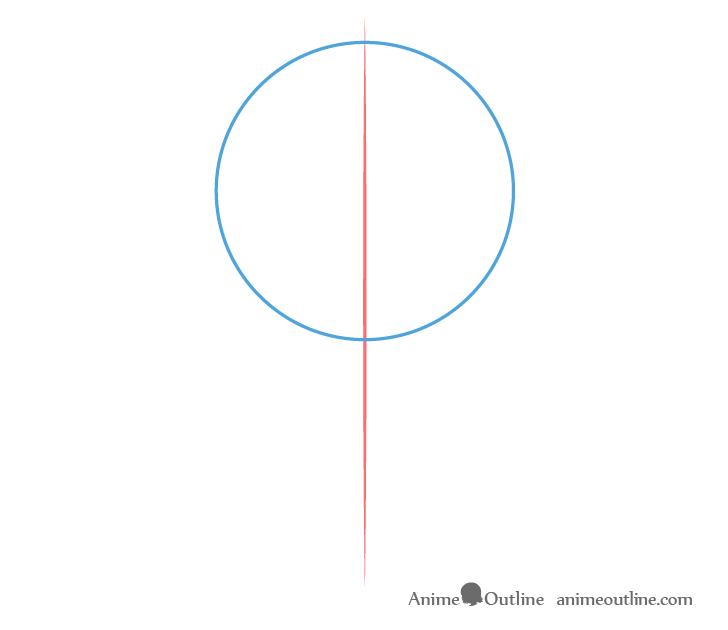
Star by drawing a vertical line through the middle of your drawing area. In this case it will be tall plenty to arrange the height of the caput, neck, and the meridian part of the shoulders.
The purpose of this line is to human activity as a guide that helps brand sure that both halves of the head/cervix/shoulders are of relatively even width. Afterwards information technology tin can too help with spacing and positioning the facial features.
At the top of this line draw a circle that will represent the pinnacle of the head.
Step ii – Draw the Bottom of the Head
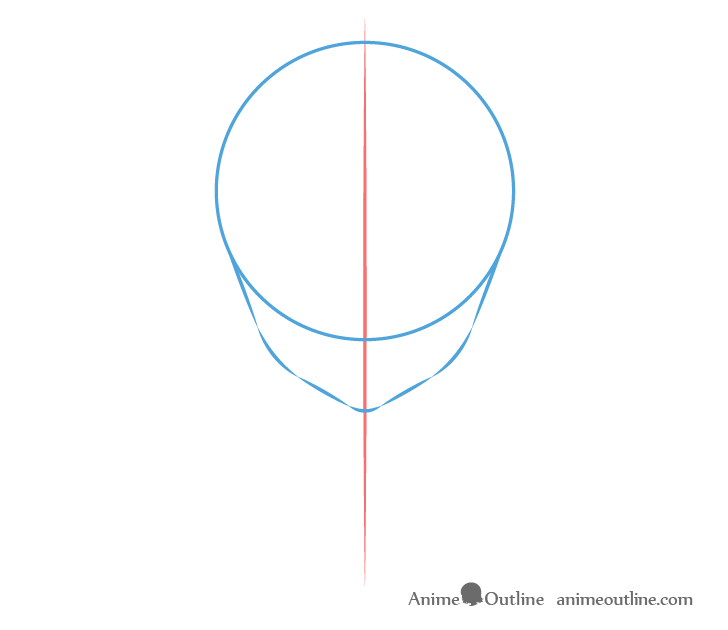
From the lower half of the circle project 2 lines downward and angled towards the center line. These should then transition into curves and then go on an even sharper angles to finally join at the curve of the chin.
Y'all can see the break down in the illustration higher up.
Step 3 – Depict the Neck/Shoulders
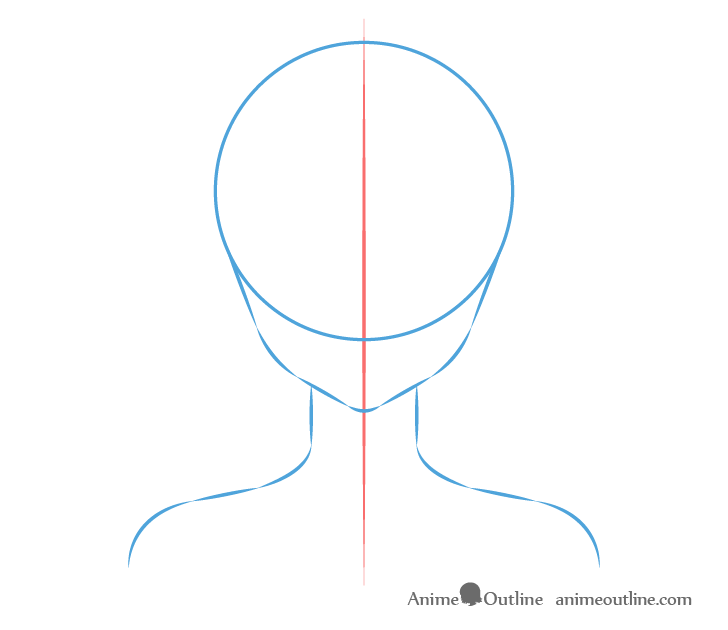
Make the neck adequately thin in relation to the head and fairly long. Information technology should somewhen transitioning into the shoulder muscles which should so transition into the shoulders.
A slender and long neck will assistance emphasize a cute grapheme.
As this tutorial mainly focuses on the face we won't go into too much detail on drawing these.
For more information on drawing anime necks run into:
How to Depict Anime Neck & Shoulders
Step 4 – Position the Eyes Horizontally
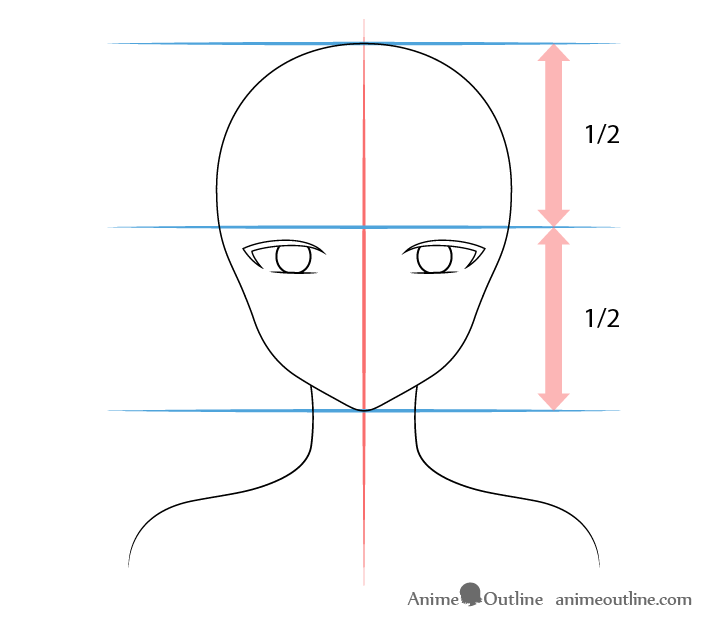
To position the eyes yous can horizontally dissever the caput in two equally shown with the example above. For the "cute girl" grapheme you can and so place the eyes slightly below this halfway indicate. the large forehead volition add to the "cuteness".
Step five – Space the Optics Horizontally & Draw Their Bones Outlines
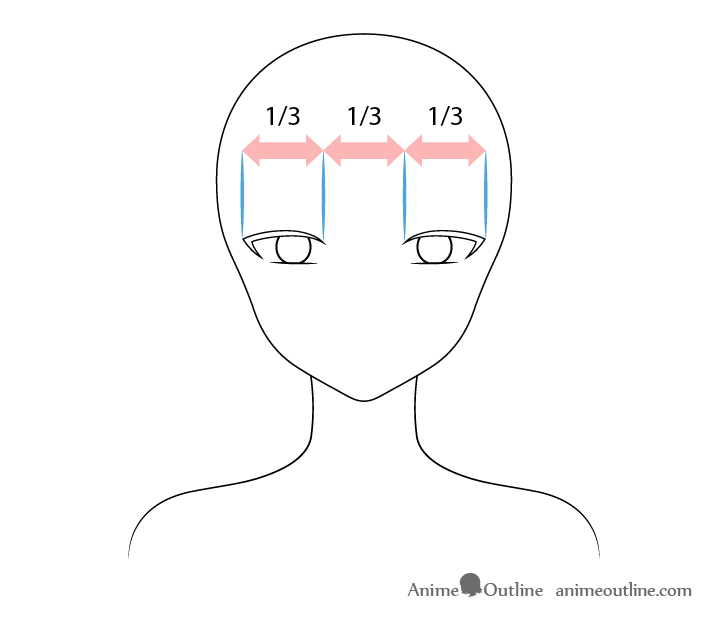
When spacing the eyes horizontally you will want to leave most enough room between them that you can fit in some other middle.
When actually drawing the eyes make them adequately narrow with relatively thick sets of top eyelashes.
At this stage you can simply outline the basic shape of the eyes without drawing all of the smaller details such equally the eyelashes.
The goal is to get-go correctly identify all the facial features.
For more good drawing practices and explanations as to why y'all desire to depict a certain fashion see:
Beginner Guide to Drawing Anime & Manga
Step 6 – Position & Draw the Eyebrows
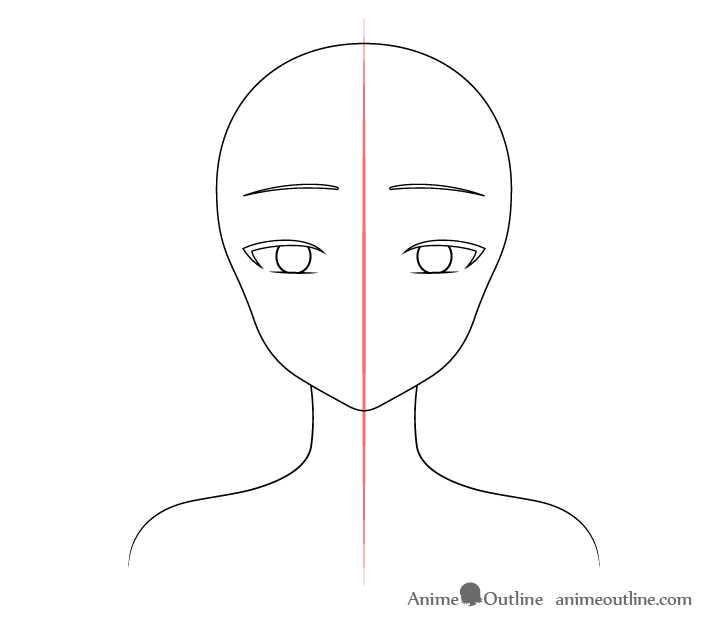
Fairly high upwardly above the eyes draw the eyelashes with thicker and slightly raised inner ends. This will help give the graphic symbol a sure personality.
For more than examples of diverse types of anime/manga eyelashes see:
How to Depict Anime Eyelashes Step by Stride
Step 7 – Position & Describe the Olfactory organ
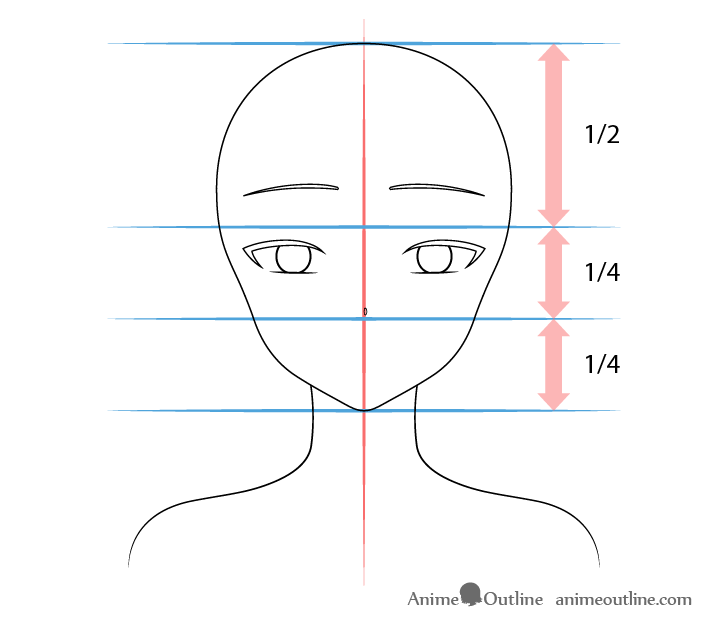
The nose will be slightly above the halfway point between the horizontal line for the centre of the head and the lesser of the chin.
Depict the nose itself close to a tiny oval in shape with the side closer to the middle of the face slightly flatter.
Footstep 8 – Position & Depict the Mouth
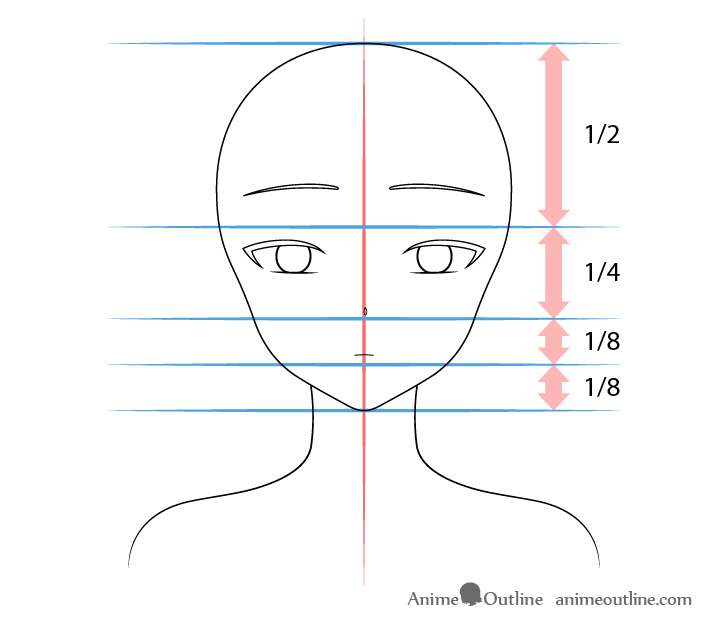
Identify the oral cavity where it'southward bottom lip (not actually drawn) would exist about halfway between the bottom of the olfactory organ and the bottom of the mentum.
Make the mouth fairly small with a very slight downwardly bend. It's very important not to draw too much of a bend or the character can become an unhappy looking expression.
Step 9 – Position & Draw the Ears
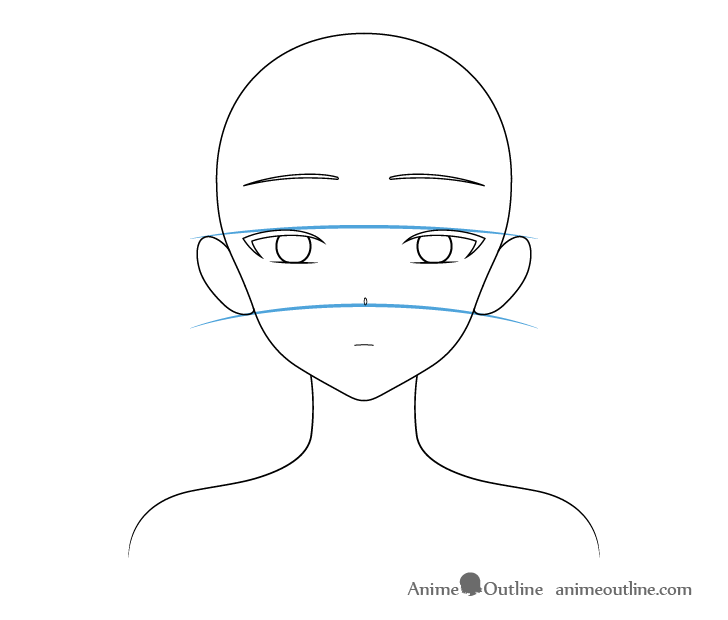
Position the ears with their tops slightly beneath the superlative of the eyes and their bottoms slightly below the bottom of the nose. For this detail character the ears will exist drawn slightly smaller and slightly lower down than is recommended for other grapheme types here on AnimeOutline.
For the other placement example also equally more information on drawing ears run into:
How to Draw Anime and Manga Ears
In this case about of the ears will be covered by the hair so there is not much demand for drawing their inner details.
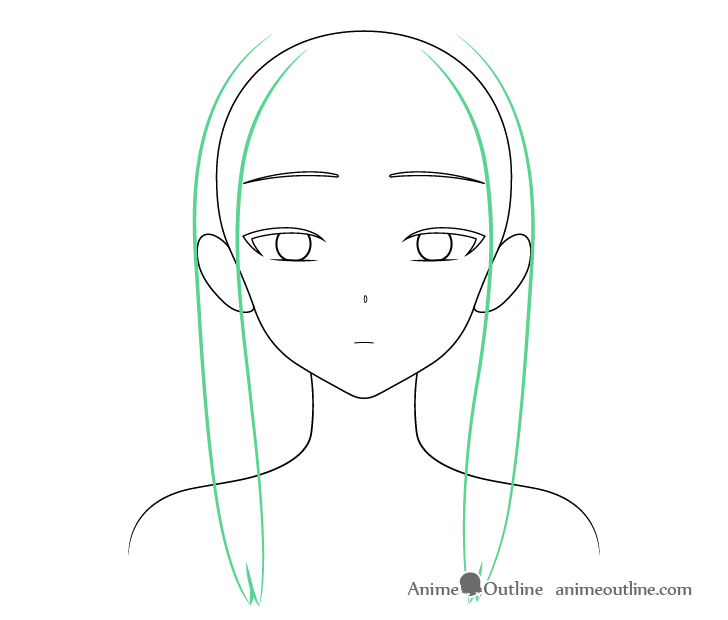
Footstep 10 – Draw the Sides of the Hair
Subsequently placing all of the facial features you can motility on to cartoon the hair.
To emphasize that the graphic symbol is cute (takes care of herself) we will give her a fairly neat hair way.
When drawing the hair y'all tin can remember of it as being split into the sides, front and back/top sections. For a more detailed explanation of this as well as examples of other hair styles encounter:
How to Depict Anime and Manga Hair – Female
Begin by cartoon the "sides" office of the pilus. In this case these will be two adequately long "clumps" that brainstorm from around the pinnacle of the head and finish with a pair of splits slightly beneath the shoulders.
Make these slightly curved as though they are hugging the head/face and also brand them slightly wider towards the bottom.
Step 11 – Draw the Front of the Hair
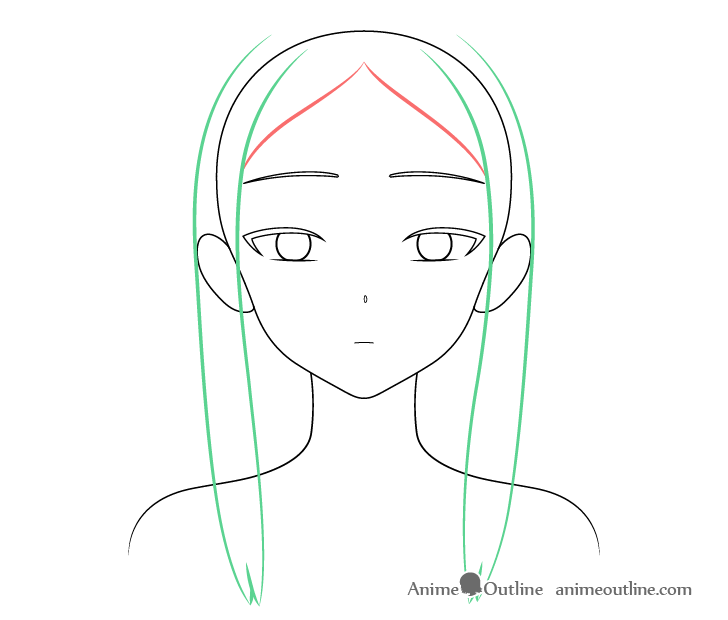
Draw the front portion of the hair dissever downwards the middle and tucked under the sides.
Step 12 – Draw the Back/Top of the Hair
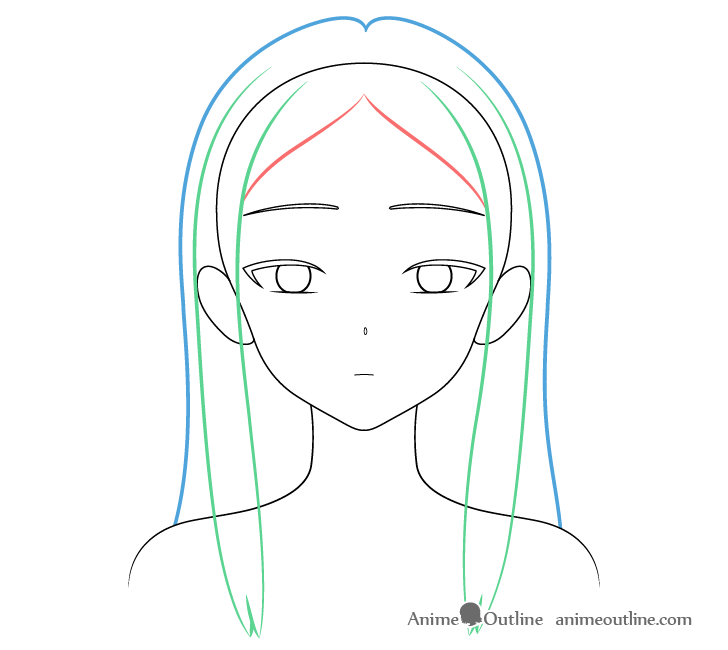
Draw the back/top section also split down the centre. The pilus should start stick slightly further up from the head towards it'southward very top, then go a lilliputian closer towards information technology almost the upper end of the sides of the head. Finally it should again curve abroad from the caput towards the middle/lesser of the caput.
Afterward yous finish drawing the hair you tin erase the parts of the head/and ears that are covered past it.
In case you are wondering why you needed to fully draw out the head and ears and not just start with the hair there are several reasons for this. One is that seeing the verbal size of the head makes it easier to place the facial features (as was shown in the previous steps). Another is that drawing in such a mode helps to avoid many potential mistakes.
For a list of common mistakes when drawing in the anime mode and drawing in general encounter:
Common Mistakes When Cartoon Anime & Manga
Step xiii – Add the Small Details
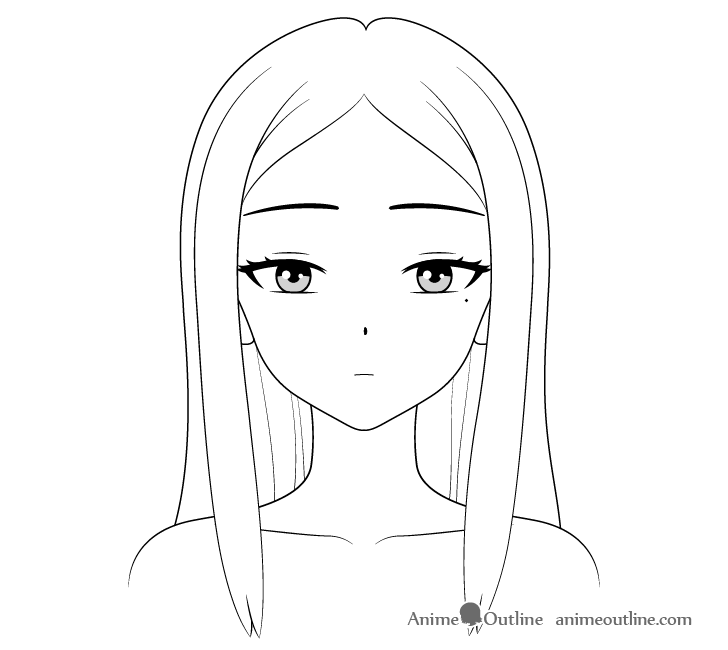
After you lot finish drawing the outlines of the hair and placing all of the facial features yous tin can so describe all of the small details.
In this case those will be:
- Inner details of the eyes
- Hair folds
- Mole/Beauty Marking
For a very detailed breakdown of drawing the eyes you lot can meet:
How to Describe Female Anime Eyes Tutorial
While the optics in that example are slightly different all of the drawing steps can be applied to the case in this tutorial.
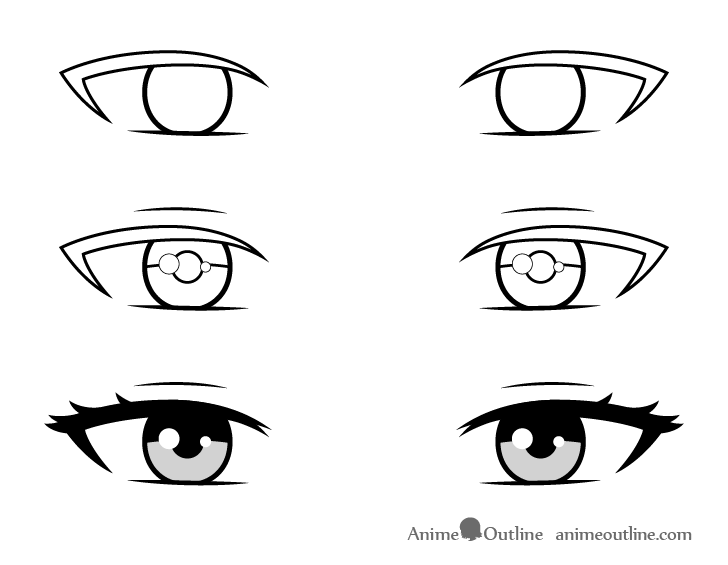
Y'all can see a basic step by step cartoon of the details of the optics above. Likewise please note that the irises are shaded gray just to make the highlights in the final drawing a bit easier to meet. If you are going to be coloring the eyes you may wish to make them a dissimilar color.
When washed with the eyes you tin can add together a few actress hair folds equally shown in the first instance.

Finally you can also add a piddling dazzler mark/mole simply slightly beneath one of the eyes (or other places). This will again help emphasize that the girl is beautiful as some famous models have these.
You can see a slightly larger version of the face above to go far a little chip easier to see.
Step 14 – Colour the Cartoon
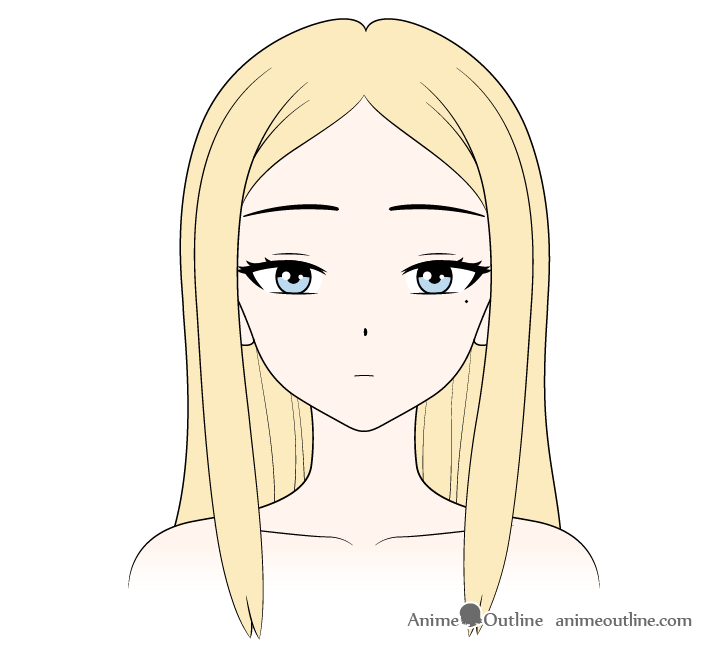
Before you begin coloring the grapheme it'due south important to notation that if doing so on paper you may desire to leave some white spots for the highlights in the pilus (see next footstep). If coloring digitally it's easier to add together the highlights in at the end.
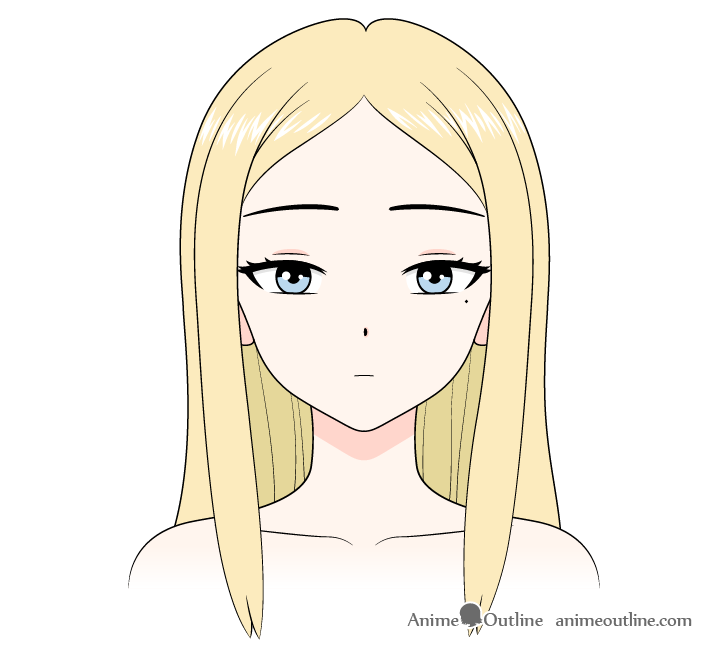
For the bodily color selection y'all can get with many potential options. In this example we volition give her fairly light blonde hair and gratuitous colored blueish eyes.
For an explanation of which colors go well together run into:
Beginner Guide to Picking Colors When Drawing Anime & Manga
Step 15 – Shade & End the Drawing
For some very bones shading yous can add shadows in the nearly common places. In this example they will exist as follows:
- Tiny shadows around the eyelids
- Pocket-size shadows below the eyelashes (bandage by the eyelashes)
- Very tiny shadow to 1 side of the olfactory organ
- Fully shaded ears
- Large shadow on the neck in the shape o the chin (cast by the head)
- Fully shaded inner role of the hair between the head/neck and the side hair
As mentioned earlier you can also add some pilus highlights as sort of white zigzag lines across the hair. As suggested earlier you can simply leave this area white and then color effectually it. Alternatively you can apply a white correction pen to add them in over acme or do it digitally.
Determination
As mentioned at the start of the tutorial, female anime characters tend to be cute by default then information technology can be difficult to draw 1 that is supposed to be beautiful. However using the proportions and facial feature placement in this tutorial tin aid create such a character.
The large forehead adds to the "cuteness" while the big but slightly narrower (than common in anime) eyes requite her a bit of a more mature face. The raised eyebrows with the downward curved mouth gives just a tiny bit of "cavalier" look (not necessarily negative), sort of like a queen or someone of the upper class. At the same time it'southward nevertheless a adequately relaxed and natural looking expression.
As mentioned this is only one mode to draw such a character. For more on drawing different anime character archetypes see:
- How to Draw Anime Characters Tutorial
- How to Depict an Anime Elf Girl Step by Step
- How to Draw a Cute Anime Girl Step past Step
- How to Draw an Anime Girl in a Mask Step past Step

Source: https://www.animeoutline.com/how-to-draw-a-beautiful-anime-girl-step-by-step/
Posted by: laliberteflooke42.blogspot.com
0 Response to "how to draw a anime girl base step by step"
Post a Comment